Tuesday, November 27, 2012

In Need of a Bench

It's been at least a month since I finished my first project and I'm starting to get the itch to get back into the workshop.  That said, I'm not real excited about doing a more complex project with my limited supply of tools and using a couple of sawhorses for a workbench.  I think that I could have built that box from my first project in a fraction of the time it took me if I had the proper equipment.  And, I don't mean power tools.  Having a solid workbench with a vise and some specialty planes would have made many of the tasks a lot easier.

I have read several articles about building workbenches, but in all of them the writer used many power tools which I don't have access to to do the work.  So, thinking that building my own bench was beyond my capability, my next thought was to just buy a bench from a woodworking supply outfit.  I started researching to find the best manufactured ones and it turns out that to get a really solid quality bench I could end up spending around $2,000, like the really nice ones that are custom made from Lie-Nielsen Toolworks.

18th-century Ruobo Workbench by Chris Schwarz
I figure that whatever workbench I get now will be the one that I use the rest of my life, so I want to make sure that I will be happy with it.  I checked a few books out from the library to try and get some ideas, one of which was The Workbench Design Book by Christopher Schwarz.  This is an excellent book, which shows construction of nine different bench designs as well as critiques on each.  One design that I found very helpful was called "18th-century Bench by Hand" in which Chris Schwarz builds a Ruobo style workbench using only hand tools.  The Ruobo bench is based on benches from the writings of the 18th-century French cabinet maker and writer AndrĂ© Ruobo.  Chris Schwarz is a huge fan of this design and he is also a huge fan of hand tools, which makes me trust his opinions more than others who use their benches with power tools.  From the article I can see that I am lacking several tools to build a similar bench by hand, which might sound like a problem, but they are basic tools that I will need for any other project.  For instance, I will need a jointer plane to level the workbench surface, but I've been wanting to buy one for awhile anyway.

I think the Ruobo will definitely be the basis of design for my workbench, but I need to figure out what all features and vise designs I want to incorporate.  The Ruobo's hefty design (with a 5" think bench top) will make it ideal to prevent movement from the hand planing I plan to do.  Also, I love the old school look of this design.


Sunday, November 4, 2012

Project #1 - Dove Tails and Assembly

I finally got around to finishing my box a couple months ago, but I'm just now getting a post together.  Unfortunately I didn't take as many pictures as I would have liked to, so I'll just have to trust my memory on what I did.  

My first step after cutting the grooves in the sides was to layout the pins for the for the dovetail joints. A dovetail joint is basically made up of two cuts that fit together, the dovetails and the pins.  I had read somewhere that it's easier to do the pins first so that's what I did.  In the bottom left picture you can see pins that have already been cut.  To layout the pins, I began by using a wheel gauge to mark the board thickness on all of the boards.
This determines the depth that the pins and the dovetails need to be.  I then picked a number of pins that I thought would look good, in this case three in the middle and half a pin on each edge (bottom left picture).  I picked an angel for the pins that I thought would look good and the spaced them out evenly.  Once the pins were laid out, I made all of the cuts with the grain using my dovetail saw (upper left picture) which is designed for cutting with the grain.  I then used a chisel to mark the cross grain cut and slowly chiseled out the waste in between the pins.  I did a couple of boards this way and then I decided to try a method using a fret saw to cut out the waste in between the pins and then clean it up with a chisel (The upper right picture shows me using this method on the tails).  This turned out to be way faster and I'll probably always use the method in the future.  Once all the pins were cut and cleaned up (its very important to make sure all the pins are straight to ensure a good fit with the tails), I lined the board with the pins up with a board that would have the corresponding tails (bottom left picture).  I then traced the pins, which left the outline for the tails on the opposite piece.  It's very important that I had each joint labelled so that I didn't mix up which tail went with which pin, because each joint will be slightly different.  Once marked, I cut out the tails the same way that I had cut out the pins.  I lined up the joints to see how they would fit and then cleaned them up with a chisel until it looked like they would fit.

After all the joints were complete, I cut the bottom panel to size.  I then attempted to test fit the entire box together, but found out that I had to clean up my grooves first.  It turns out that as I was going deeper while cutting the grooves, I did't go straight down and the walls of the grooves were sloped.  Once I straightened the grooves, the bottom panel fit in pretty good.  I assembled the box by positing the bottom panel into the ends of the box first (bottom right picture).  I then hammered the side boards with the tails down onto the end boards with the pins.  My joints turned out to be too tight and I created some splits at the the corners of a couple of the pins.  The good thing is that because the dovetail is such a strong joint, these splits can't be noticed.

I then disassembled the box, clean up the joints a little bit more, brushed a little wood glue on the joints and then hammered it back together.  I clamped it up over night and when the joints were dry this box was solid as a rock.  I see why the dovetail joint has been used on quality furniture for so many years.  Finally, I cleaned up the surfaces with a scraper and the edges with the block plane and sand paper.  I didn't put any kind of finish on it, because I liked the look of the bare wood.  I may still put some sort of oil on it to protect it, but I need to do some research on that first.
I hope to expand my wood shop before my next project, but there are so many things that I want.  There are many tools that would help speed up these projects and allow me to do more things.  I think I really need a heavy duty workbench with a built in vise that won't move while I'm planing.  I also really need a good set of sharpening stones, because having a nice sharp chisel makes a world of difference.  Of course there's a variety of planes that I would like as well.  Choices. Choices.


Friday, March 30, 2012

Project #1 - Cutting Grooves

Ok, so I'm way behind on my posts and on finishing my first project.  For awhile, I was waiting on a new chisel to come in the mail, which I needed cut the grooves in the sides of the box.  Well, it finally came and I got the grooves cut, but then Janel and I decided to start a bathroom remodeling project.  I've spent just about every night for the past three weeks working on the bathroom, so I haven't had time (or energy) to post or finish the box.
I got my new 1/4" chisel in about four weeks ago.  It is from Lie-Nielsen Toolworks and it came well sharpened and ready to go.  I wanted a quality chisel for the groove cutting, because I knew it would be hard work.  The maple I'm using for the box is pretty hard stuff and using anything but an extremely sharp chisel would have just about killed me.


To cut the grooves, I took a marking gauge and made a mark 1/4" above the bottom edge of all four side boards.  I then took the chisel with the bevel side up and cut a thin shaving along the edge of my mark (upper left picture).  I then went back over it repeatedly until the groove began to form.  At that point the chisel was pretty well guided by the groove and I could put more pressure on the cut to speed things up (upper right picture).


Once the grooves were 1/4" deep I came back and squared up the ends (lower left picture).  I ended the grooves 5/16" from the end of the boards so they wouldn't be visible once assembled.


I have also begun to cut the dovetail joints and will hopefully be able to post on that soon.

Sunday, February 12, 2012

Old Bits Like New


 Since I can't really do any work on my box until I get my new 1/4" chisel, today I decided to clean up some old tools that I bought at an estate sale last month.  I had read that soaking old tools in citric acid would loosen the rust on them, so yesterday I went to a brewery supply store and bought 8oz of it.  They were pretty busy while I was there, so I had time to look around and dream of other hobbies I could get into.  Of course, right now I have plenty on my hands, so beer making will have to wait for another day.

The picture in the upper left is my brace and bits before I did anything to them.  In the upper right the bits are soaking  in a solution of about 1/4 cup citric acid power and 1/2 gallon of warm water.  After about an hour, I started scrubbing the bits with strips of Scotch pads.  In the picture in the lower left, you can see difference.  Once all the bits were scrubbed, I sharpened them with my auger bit file as seen in the lower right picture.  I then rubbed them all down with some light oil to prevent them from rusting again.
I decided not to soak my brace in the citric acid, mainly because I think it takes away from the value of an old tool.  Also, it would only improve the aesthetics of the tool and not and its operation.  Instead I sprayed it down with WD-40 and scrubbed off a little of the surface rust.  I also took apart the chuck and cleaned it with WD-40 and a brass bristle brush.  Then I wiped it all down, put it back together and put a little oil in the bushing on the top knob.  I also took apart my egg beater drill and cleaned it with WD-40 and oiled it up.


At the left are my drills and bits all ready to go to work.

Saturday, February 11, 2012

Project #1 - A New Box For Blocks - Hand Holes

In my last blog I mentioned that I hoped to be writing about cutting dovetail joints this time, but I was getting ahead of myself.  I decided it would be better to cut out the hand holes on the ends of the box and the grooves for the bottom panel before cutting the dovetails.  This should reduce the chance of me breaking off one of the dovetails before the box is finished.

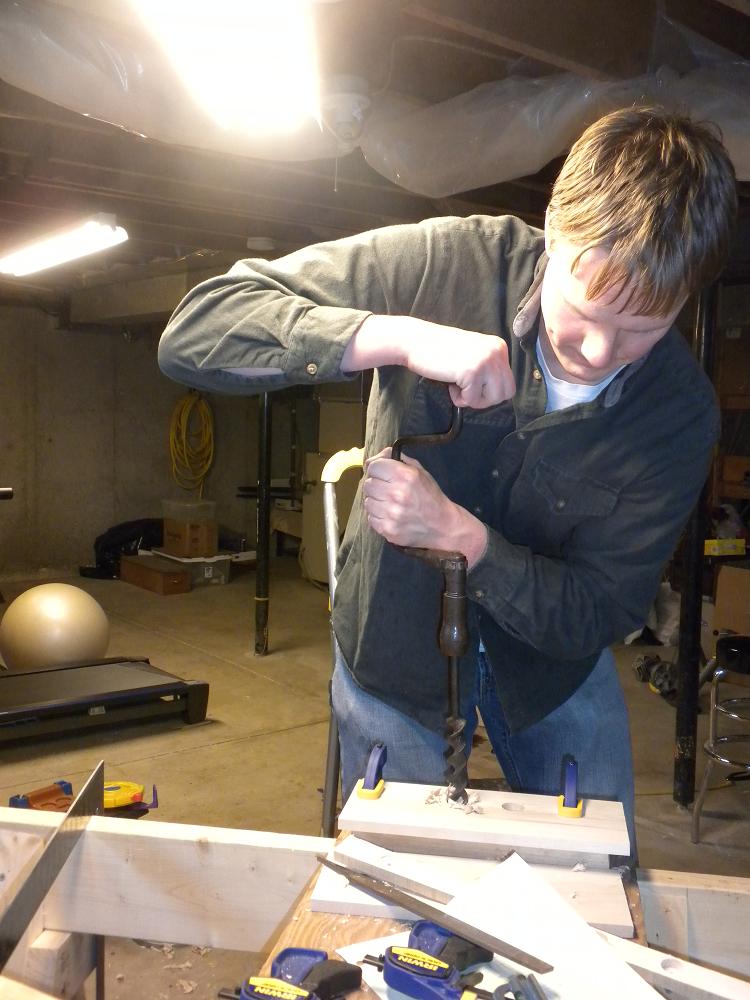
Since I'm still waiting on a new 1/4" chisel to come in the mail so that I can cut my grooves, I decided to cut the hand holes today.  I was lucky enough to come across a brace and some auger  bits at an estate sale last month, so I had all the tools I needed.  However, once I tried to use the 1" auger bit, I realized that it wouldn't cut at all, so I tried sharpening it with a standard file.  This didn't help any, so I did some research (Thank you Google) and found that there is a special file for sharpening auger bits.  I ordered one of these from Lie-Nielsen and got it on Friday.  The file is flat and comes to a point for getting into the tight spaces on small bits.  Also, it doesn't have teeth on the sides so that you don't accidentaly tear into the bit.  The file seemed to work pretty well, but I still couldn't get my bit to cut.  Finally I thought that I should compare it to another bit and I realized that the cutting angle was way to small.  After filing a much steeper angle, I got the bit to cut.  In the picture on the left, I'm drilling out the material that will make the hand hole.

In these, you can see that I drilled three holes to make up the hand hole.  In the pictures on top I'm cutting out the remaining material with a chisel and in the lower left, I'm cleaning up the edges.  In the lower right, I'm smoothing the edges with a file.

When I was designing this box, I was worried about how I was going to make the handles and have them look good.  As it turned out, it was easier than I thought and I'm pretty happy with them.


Also, today I went to a brewery supply store and bought some citric acid.  I've read that it's good for removing the rust from old tools and I was going to use it to refurbish my drill bits.  As you can see from the picture above, I decided to hold off on that and rather do some work on my box.  If I don't get my new chisel in soon, then next time I might be blogging about cleaning up old drill bits.


Saturday, February 4, 2012

Project #1 - A New Box for Blocks - The Beginning

 For my first project, I knew I didn't want to get in over my head.  I didn't think it would be a good idea to start working on our new bed right off the bat (see post #1).  I wanted something fairly straight forward that wouldn't take a lot of time to build and that wouldn't require a huge variety of tools that I didn't have.  What could be more simple than a box, right?  Well, probably several things as it would turn out.  The picture on the left is the current setup for my 2-year old's wooden building blocks.  It's working for now, but I have a feeling that eventually it will get torn apart.  A new wooden box should be a pretty simple and straight forward project and it will allow me to practice on some basic woodworking techniques. I plan to use dovetail joints at the corners and the bottom of the box will fit into grooves that I cut into the sides of the box.
The drawing on the left is what I sketched up.  It shows five sides, 1/2" thick, with an open top.  When it is full of blocks, there should be a 1/4" gap all around the sides and the blocks should be pretty much flush with the top.  I have made some design changes since putting this drawing together.  The first will be to add some hand holes to each end of the box so that a child can pick it up or drag it.  The second change I made while shopping for the materials, which I got a Metro Hardwoods in Independence.  While looking at the 1/2" Hard Maple, I thought that it looked unnecessarily thick for the bottom of the box and was worried that it would add a lot of extra weight.  Fortunately they also carried 1/4" Hard Maple.  Using this for the bottom will save on weight and it will save on work since I won't have to cut the rabbets that I show on my drawing.  So, $21.00 later I walked out of the store with a 6' x 6" piece of 1/2" Hard Maple and a 4' x 6" piece of 1/4" Hard Maple.


This is a picture of my material already cut to length.  Also, on the left side you can see that I have already glued two pieces of the 1/4" material together to make the bottom panel.  My first challenge of this project was to use my new block plane to create two really straight sides so that I would have a good joint going down the middle of the panel.  This really should be done with a longer plane, but I had to make due and I think the it turned out pretty well.


The pictures below show what I've done so far.  At the left I'm ripping one of the boards to the right height.  In the pictures in the middle and at the right, I'm planing the end grain to square up the ends.  As you can see, I had to come up with a special technique to hold the saw horse still while I planed.  My wife's grandfather suggested that I push the saw horse up against a wall to keep it from moving.  I definitely need to consider getting more advice from guys who have been working with wood their whole lives.  They usually have a lot of simple solutions for doing things.


This project should really only take a day if I had the right tools.  So far I've worked on it on three separate days for an hour or two at a time.  Part of the reason I haven't done more is that I was waiting on a pair of saws that I bought on eBay.  One of them is a rip saw and I thought it would make my rip cuts a lot easier.  It did, but it's really too coarse for cutting hardwood.  I'll use it for the rest of this project, but I think I'll keep my eye out for another one with more points per inch.  I'm also still waiting on a 1/4" chisel that I ordered to cut the grooves to hold the bottom panel in and a file that I'll use to the smooth out the hand holes in the ends of the box.  Hopefully soon I'll be able to post about cutting my first dovetail joints.

Monday, January 30, 2012

Christmas Money and a New Shop

I know that January is almost over and I'm writing about Christmas money, but since I just started this blog, I have some catching up to do.  I'm very fortunate to have parents and in-laws that feel the need to spend a lot on me for Christmas, but since they don't know what to get me, they just give money.  It was just before Christmas that I decided to start my hand tool workshop and I knew that I would likely have some cash coming my way to fuel my new interest.  With my "Made by Hand" book I used Christmas vacation to plan what I would need to get started and I used the internet to price everything out .  From what I had read, it became apparent that I needed several types of planes and some specialty saws for cutting joinery.  I would also need various layout tools and chisels.  After adding up the cost for all the tools that I wanted, I realized that my Christmas money wouldn't come close to covering it all.  I would have to make some tough decisions on what I needed first.  


I decided I would start with a good all purpose hand plane.  I also decided to get a quality dovetail saw, since dovetail joints are very common in furniture making and give a handcrafted look.  I ended up buying a new block plane and dovetail saw from Lie-Nielsen Toolworks, who make the best hand tools you can buy, or so I've read, and they're made in the good ol' USA.The picture at the left is basically the beginning of my hand tool shop.  In the back is a large hand saw I got from Home Depot a couple of years ago. From left to right are a miter saw I've had, my new Lie-Nielsen dovetail saw, an adjustable square, a new marking gauge I got from Veritas, my new Lie-Nielsen block plane and a card scraper.  I also have an assortment of Irwin clamps.


This picture shows what I'm using for a workbench.  It consists of a couple saw horses I built last year and a small piece of plywood.  It definitely isn't an ideal situation, but so far I've been able to improvise.


Now that I have some tools, what should I build first?

Sunday, January 29, 2012

Woodworking and Creating a Blog

I've enjoyed woodworking, since I was a little boy sitting on our basement steps tacking a couple of boards together.  Sometimes there was an end result in mind, but most of the time my brothers and I just thought it was fun to saw and hammer wood.  I've always wanted to have my own wood shop and even though I've been married and have lived in my own house for over five years, I just haven't done it.  Of course, I have been a little preoccupied with being married, and having two little boys, 2-1/2 years and 7 months old.


My wife, Janel, has wanted a new bed pretty much since we've been married.  Our current one uses a metal frame only and doesn't have a head board or foot board.  Recently we discussed getting a new bedroom set, but I refuse to buy cheap foreign made bed from the really big box store in town.  Last year we looked at the furniture store Simply Amish just out of curiosity.  The furniture is all locally hand crafted, very high quality, and beautiful.  Also, despite the name, they offer many modern designs.  The only downside is that the price matches the high level of quality $$$$$.


I half jokingly suggested to Janel that I would just have to build a bed myself.  To my surprise she said that maybe I should, but  I don't think she realized what she was getting into.  I started researching table saws, which is the foundation of every wood shop.  The more I read, I realized that I would have spend a decent amount of money to get a quality table saw.  It looked like a good used one would run from $500 to $1,000.  Of course, I probably could have done just fine with a used contractor's table saw that would cost from $100 to $200.


Sometime during my research on table saws I came to a realization.  When the heck was I going to have time to use any power tools?  I usually have a three hour period about once a month when Janel is off with the kids and I have the house to myself.  Other than that, I'm either watching the kids or they're napping, and no way could I operate a power tool then.  This realization got me dreaming about moving to the county where I could construct a stand alone shop and would be able to fire up noisy tools whenever I wanted.  The idea of moving to the country is the subject for another blog and isn't going to happen anytime soon.


I was starting to feel that my woodworking aspirations would have to wait until the kids were older.  Of course that would mean no more naps.  And, Saturday and Sunday nap-time is my time to get stuff done.  Maybe in another 18 years when the kids are out of the house I could have a wood shop.


It was about this time that I was searching for woodworking books on the Mid-Continent Public library's online catalog and came across a book by Tom Fidgen called, "Made by Hand".  It sounded interesting, so I picked it up.  It turned out to be great book and really opened my eyes to what was possible with hand tools.  The book is really a beginners guide to hand tools.  It discusses the basic tools needed for a hand tool shop and how to use them.  It then has a step by step description on building several project by hand.  Most importantly this book has convinced me that it's possible to build high quality furniture by hand and in a reasonable amount of time and effort.


Now I had the motivation I needed to move forward.  I could purchase all the hand tools I needed for a fraction of the price of a couple power tools and without all the noise, I would be able to work when the kids were napping and after they'd gone to bed at night.  With the feeling that I'm about to start something that could continue for awhile, I've decided that I might as well record my adventure.  And in true 21st century exhibitionism I should share this with the whole freaking world.  And so begins my woodworking blog.