Saturday, February 24, 2018

Catching Up - Step Stool for MCC Sale

Almost every year since I can remember my family has attended the Kansas Mennonite Relief sale held at the Kansas state fairgrounds in Hutchinson, Kansas.  The sale is a two day event that involves eating traditional Mennonite food, a huge quilt auction, various booths where crafts and other items can be purchased, and a general auction.  All of this is a fundraiser for the Mennonite Central Committee (MCC) and is used to support their programs all over the world.  I've always enjoyed sitting in the general auction, especially when my dad was around, and watching the various items sell.  They would sell everything you could imagine at this auction from tools, toys, crafts, furniture, automobiles, and everyone's favorite, the restored tractors.  My grandpa had a few cousins that were very talented and made items for this auction.  His cousin Orie Voth would make a clock every year and sometimes a step stool or something small.  He also had a set of twin cousins, Marie and Martha Voth who did amazing wheat marquetry seen Here.  They would make one of these every year for the sale and they often sold for over a thousand dollars and sometimes double. 

Warkentin Mill in Newton, KS by Marie and Martha Voth

Ever since I began woodworking I've wanted to build nice furniture that other people would want to have and buy and I've especially wanted to build something for the MCC sale.  With limited time I had so far focused on learning the skills of hand tool woodworking while making a few things for myself.  In the fall of 2016 I decided that the time had come and I would make something to be sold at the MCC sale in the spring of 2017.  I wanted it to be something small and not overly ambitious since this would be my first piece of "nice" furniture.  I had seen some neat dovetailed step stools on the internet and decided that would be a perfect project for the sale.

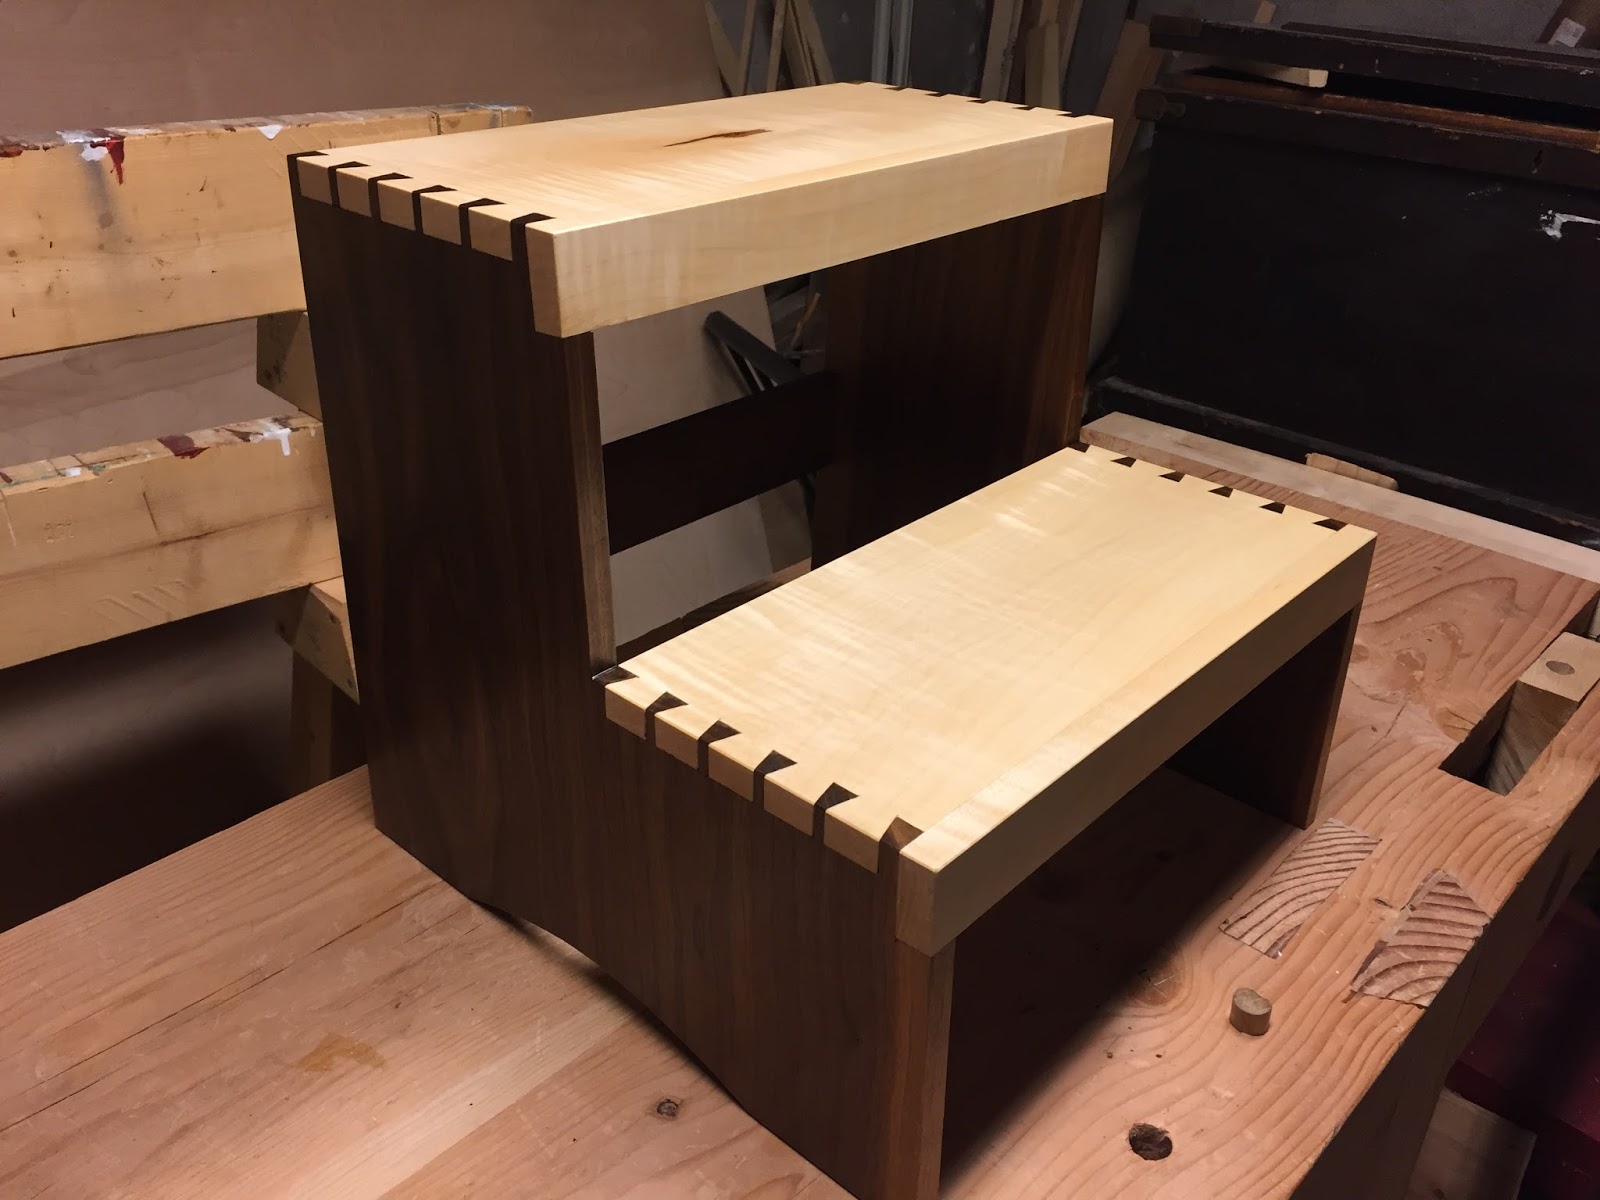
I had wanted a step stool for our kitchen that the boys could use instead of pulling a chair in every time they needed something so I bought enough material to do two step stools.  I built the one to keep first as a practice for the one to sell.  I really wanted to show off the hand cut joinery of the pieces and bought some nice dark walnut for the sides of the stool and some light curly maple for the steps.  Here are some photos of the process.


Sawing walnut to length 
Planing walnut for flatness


Jointing the edge of a maple step
I glued two walnut pieces together to get the full width needed for the sides of the stool.  I then cut the shapes for the two steps into the walnut sides and tapered the front and back edges.  After that was lots of dovetail practice.  I cut all the pins in the walnut sides for both steps and then followed with the tails in the maple steps.

Cutting walnut sides to shape


After gluing the steps, I added trim to the front of the steps and then a support across the back.  I then planed and scraped the entire step stool to make the joints as seamless as possible.  For durability I finished the stool with a few coats of semi-gloss polyurethane.


Then, I did this all over again, making the second step stool slightly smaller and also adding some extra dovetails.  When going to auction, my only hope was that the step stool would sell for at least $100.  Anything less than that would be a disappointment.  To my delight there were a couple bidders it sold for $250 to some family friends we used to go to church with.


Friday, February 23, 2018

Catching Up - Michael's Toolbox

I'm taking another stab at getting this blog up to date with my projects.  I had surgery yesterday on my knee and will be in bed for a few days, so I hope to use some of this time to get completely up to date.  Today I'm posting about the toolbox I built with my oldest son, Michael, when he was in Kindergarten.  I got motivated when reading a post Here by Joshua Klein on his The Workbench Diary blog which was one of my favorite blogs.  He had made a small 18th century style workbench for his son Eden for Christmas and I saw all these great pictures of 5 year old Eden sawing and planing and thought that if he could it, then Michael who is the same age, could surely do it.  Joshua has since moved on from his Workbench Diary blog and created my new favorite magazine, Mortise & Tenon, which you can check out Here.

We designed Michael's toolbox much like my early 20th century carpenter's job box. It is a basic dovetailed box with dovetailed trim.  The lid has a registered fit on the box making for a very sturdy toolbox that should last him a lifetime.  I was actually quite surprised and impressed at how much Michael was able to do at his age.  He did much of the sawing and even chopped some dovetails with my help.  Here are some pictures of Michael at work:

Using the saw his grandpa got him for Christmas

Learning to chop his first dovetails
Sawing dovetails in the trim 
Cleaning up the joints with a small hand plane


Using a router to make recesses for the hinges

Competed toolbox prior to painting

Michael chose a nice red pain that we had on hand


Finished toolbox

Thursday, February 1, 2018

Catching Up - Spice Rack

In my goal to get caught up with posting projects, today I'm focusing on a little spice rack that I built and installed in a narrow kitchen cabinet after we remodeled our kitchen about five years ago.  The wood for this project came from a pallet that the kitchen cabinets were delivered on.  I basically built two racks.  One for wider jars and one that was thinner sized to fit standard spice canisters.  I used cabinet rollers to mount the racks, allowing them to slide out.  The thinner rack is mounted to the larger rack, allowing it to extend out farther.  I had a hard time finding the right rollers that I wanted and in the end the racks don't extend out as far as I would like (especially with the microwave extending out).

The larger rack used wood slats to keep the jars in place, while on the smaller rack I experimented with steel rods.  The rods were about 1/16" diameter and I bent them near the ends to fit them into holes that I drilled on the rack.  I rubbed the rods with steel wool to shine them up and then sprayed them with lacquer for protection.  I really like the look of the steel rods on the wooden frame  and they allow for maximum visibility of the spices.

Finally the rack was finished with boiled linseed oil.

A few things I learned from this project:
1. Dovetail joints don't work so well when arranged with the grain on the side of a board.  They are really best for use on the end grain.  Lining them up along the grain just invites them to split.
2. We use a lot of spices.  It would have been good to have a wider cabinet with a third rack.
3. Cabinet rollers are good for cabinets.  The ones I used are very stiff as they are rated for quite a bit more weight than we have on the spice rack.  If I ever do this again I will try to come up with a better system that extends the racks more.

The was a fun and very practical project that we get to enjoy every day.


Friday, January 12, 2018

5 Year Catchup

Well, it's been 4 1/2 years since I last posted and I think it's time to get caught up!  While I don't have a lot of time for woodworking due to the requirements of the other priorities in life, I have gotten a few things done in the last 4 1/2 years.  Here is a short summary of some of the project that have occupied me over that time.

  • Kitchen remodel
  • Making a bed for my oldest son Michael
  • Spice rack
  • Hoop house for the garden
  • Worked with a contractor to completely renovate my dad's house and sell it
  • Built-in closet shelving/cubby system
  • Tool box for my son Michael
  • Made a bed for 2nd son Henry
  • Cajon - drum box
  • Pair of step stools
  • Tool box for Henry
  • Ornament holder with my wife Janel
Oh, and we add two little ones to our family during this time.  A son, Lucas, in 2014 and a daughter, Isabel in 2016.

I hope to create posts showing some details on these projects in the next week.  The posts will focus on the spice rack, tool boxes, step stools, and ornament holder since I only used hand tools on these projects and that is my intended focus for this blog.


Dormer


Michael's Bed
  
Closet


Cajon - Drum Box
 
Hoop House

  
Step Stool


Henry's Toolbox

Monday, July 15, 2013

Carpenter's Tool Chest

This weekend Janel and I followed an estate sale lead from her aunt and uncle that promised a good selection of hand tools.  The sales began Thursday and we didn't find out about it until Sunday, so most of the hand tools worth looking at were already gone by time we got there.  There was, however, a pretty cool chest that caught my eye and I instantly recognized it as a carpenter's tool chest.  The only reason I recognized it was because of my recent interest in hand tools and I have come across many pictures of similar chests on the web.  The sticker on the chest said $350 but since it was the last day of the sale, everything was 50% off, so I picked it up for $175.  I don't really know what it's worth, but it seemed like something I shouldn't pass on.
Every carpenter a 100 years ago would likely have a similar chest to keep their tools in and carry them to and from job sites.  I think that typically the carpenter would have made the chest himself and assume that is the case for mine.  Unfortunately I don't know much about this chest and who used it.  I couldn't find any names or dates in it.  It has three sliding trays in the top half of it and below that is all open space for larger tools.  The corners of the chest and the trays are all joined with hand cut dovetails and you can clearly see the scratch from the marking gauge from when the cuts were laid out.

Here is a photo that I got off the Lost Art Press website that shows several carpenters and their tool chests.  This photo is circa 1910 and I assume that my chest is from around that time as well, possibly a little later.


Friday, July 5, 2013

Workbench - All Done

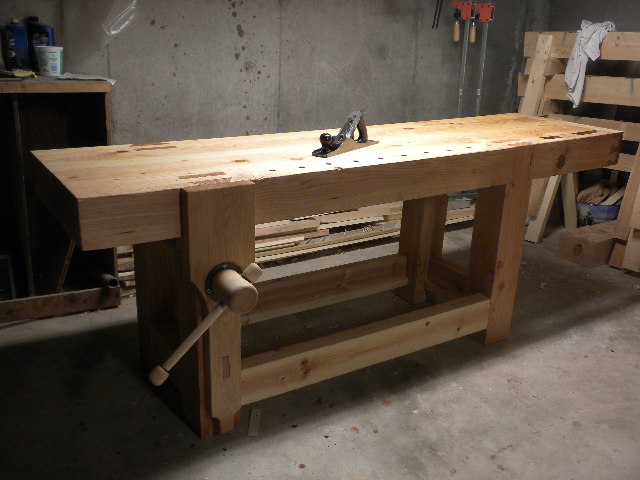
Well, I finally have a finished Workbench.  Building this thing only using hand tools was a lot of hard work, but definitely satisfying.  I'm looking forward to putting it to work and I've got plenty of things in mind that I want to build.  They will probably have to wait until fall though, because right now I've got plenty of other projects that I need to get caught up on.

As promised in my last blog, here are a couple of shots of the leg vise.  It works by sticking a screwdriver in one of the many holes in the parallel guide at the bottom.  The hole used depends on the thickness of the piece being clamped and it makes sure that the vise applies pressure evenly on the whole piece.  I've tried it out and it's amazing how much holding pressure this vise has.


The last couple steps to finishing this bench, which I did this week, was to replane the surface, because it had bowed quite a bit and to apply a finish.  For the finish, I rubbed the whole thing down with boiled linseed oil to give a little protection and it also makes it look really nice.

Friday, June 21, 2013

Workbench - Leg Vise

Over the last week, I've been working on the chop for the leg vise on my workbench.  I'm making it from a piece of 2" thick hard maple,  which made it a good workout to rip it to size by hand.  To reduce the weight of the chop, the bottom half is trimmed where it isn't used for clamping.  To make it look nice, I added a curved transition, which I cut with my new bow saw that I bought while at the Handworks Tool Show in Amana, IA a month ago.  It basically functions like a coping saw, but on a bigger scale.  I was glad to have this saw, but cutting these curves in the thick stock was a lot of work, even with the most coarse blade.


I used auger bits, chisel, and then a rasp to create the hole for the wooden screw to go through.  Then I cut a through mortise to mount the parallel guide.

The parallel guide is made from 5/8" hard maple.  It will be glued into the mortise in the chop and then it will slide through the mortise that I cut into the bench leg.  The purpose of the parallel guide is to keep the chop from racking.  Also, there is a series of holes drilled into it.  A pin will go through one of the holes to set the distance that the chop is away from the leg.  This distance should match the thickness of the piece being clamped and keep the chop flat against the piece.

Soon I should have some pictures up of the entire bench assembled and will try to include some pictures on how this vise works.


Wednesday, June 12, 2013

Workbench - Putting It Together

The final step before gluing the entire bench together was to prepare the front left leg to accept the leg vise.  I had purchased a wooden screw kit from Lake Erie Toolworks that I'm using for this vise, which came with a large wooden nut as seen in the picture below.  I first drilled and a 2-1/2" hole through the leg for the vise screw to pass through.  Then I cut the mortise using a miter saw followed by a chisel to clean out the waste.  This is similar to what I did when I cut the dovetails into the bench top.  I also cut a through mortise towards the bottom of this leg for the parallel guide for the vise (more on this in the next blog).

Before assembly I trimmed the joinery for the legs and bench top quite a bit.  The thought of getting everything glued up and then having the glue set before I could get the legs hammered all the way in didn't excite me.  I also drilled 3/8" holes in all the legs to accept dowels to hold the stretcher tenons good and tight.  When it came time for assembly, I made sure I had everything laid out and ready to go.  I also enlisted the help of my wonderful wife, Janel, to help get everything together as quickly as possible.  To be safe, I bought an epoxy with a 60 minute gel time to make sure I could get everything together before it hardened.  As it turned out, everything went together relatively smoothly, although I did have some trouble getting some of the oak dowels in.  Some of the holes didn't line up as well as they should and the quality of the dowels was a bit questionable. To help get the dowels in, I used a ratchet strap to pull the legs nice and tight .  We then flipped the bench on to the ground and I hammered some maple wedges into the tops of the joints to really tighten them up.  I can't tell you what a relief it is to finally have the legs in this thing and move on to another part.

Right now I'm finishing up the leg vise and will hopefully have a post on that soon.


Henry inspecting my work

Thursday, May 23, 2013

Workbench - Stretchers

 In my last blog, I mentioned that I would come to regret forcing the legs into place with a sledge hammer.  For one, the joints didn't fit the way they should in spots and by forcing them, I either split part of the bench or the high spot on the joint pushed the leg off the correct angle.  Also, my intention was only to dry fit the legs because I would still have to remove them to install the stretchers.

I initially flipped the bench upside down and tried knocking the legs upward with a 5lb hammer, but they didn't budge.  Since that didn't work, I flipped the bench back over and then put it up on my tall saw horses so that the legs were dangling up off the ground.  This allowed me to hammer downward and use a lot more force.  In this position I was able to use my sledge and after some good solid blows, I was able to get all four legs out.

Before I knocked the legs out, I used the bench to prepare the stretchers, which will connect the legs down by the floor.  Each stretcher will consist of two 2x6's glued together with one being longer than the other to form a tenon that will go into a leg.  I used standard home center fir 2x6's and after drying in my basement for the last few months they had cupped quite a bit.  To be able to glue them together I had to do a good amount of planing to get them flat and straight.

One 2x6 was a little longer than the other, which when glued together created a natural tenon.

Once again I used the process of using the auger drill bit followed by a mortising chisel to create mortises in the lower part of the legs where the stretchers will be located.  These mortises actually intersect on the inside, allowing the tenons to go as deep into the legs as possible.

Once the mortises were cut, I put a 45 degree cut on the end of the tenons and then trimmed them to match the height of the mortise.

I'm starting to see the daylight at the end of the tunnel on this project and I'm looking forward to actually putting this bench to work.


Sunday, May 5, 2013

Workbench - Leg Joinery 2


After cutting the joinery into the ends of the bench legs, I then traced the joints onto the bench top.  Tracing is the only way to do this because each leg ended up being a little bit different.  Next, I used an auger bit to remove as much material from the mortise, which I then cleaned up with a mortise chisel.  Then I flipped the bench top over and repeated this from the other side and cleaned the mortise all the way through.

Next, I flipped the slab up on its side and cut out the dovetails.  I used a miter saw to make the angled cuts and one cut down the middle.  Next, I used my mortise chisel to pop out most of the material and then cleaned up the edges with a paring chisel.

After the joints were cut I tried to dry fit the legs into the bench top.  After a lot more cleaning up with the paring chisel I still had trouble fitting the joints.  Finally got out the sledge hammer and gave the legs a little extra encouragement (A decision I would come to regret).