Monday, February 11, 2013

Workbench - Tail Vise Preparation


Now that I have all four sides pretty flat and parallel my next step was to saw the ends square and to length. This was a good workout, but didn't take too long with my recently sharpened crosscut saw.  Fortunately, I had my son Michael there to give me encouragement.

Benchcrafted Tail Vise


The left end of my bench will have a tail vise that will operate parallel to the benchtop.This vise, which is manufactured by Benchcrafted works by sliding a peg, also called a dog, allowing you clamp a board between a stationary dog.  The advantage to this type of end vise is that because it is integral to the bench top, the area around the clamping point is very strong.  The disadvantage to this vise is that it requires a lot of material to be removed from the underneath side of the benchtop.  This is not a big undertaking if you use an electric router, but it my case it has required time than I would have liked to sped installing the vise.

I began the cutout for the vise by using my rip saw to cut the track where the sliding dog will run.  I finished removing this piece by chopping through the remaining section with my 3/8" mortise chisel.


I then drew out the area that I needed to cut out and went at it with a brace and auger bit.  I followed this up with the mortise chisel again, removing the remaining material and getting all the dimensions to where they need to be for the vise to work properly.  By the time I to the point of the picture below, I felt more like Michelangelo whacking at a piece of marble than a carpenter.

Thursday, January 17, 2013

Workbench 1

I began work on my workbench by cutting the 6x6 beam into lengths for the legs.  It was pretty easy work since I just sharpened the teeth on vintage crosscut saw.  I cut the legs to 33", which is one inch longer than the finished length.

Next, used my jackplane to roughly plane all four sides of each of the two top slab pieces.   Then I worked one of the edges to get it as straight and flat as possible.  I planed at an angle to the grain to remove as much material as possible.  Then I followed up with my jointer plane to make the edges as straight and flat as possible.

Once I had two flat and straight edges, I stacked the two slabs up to see how they fit together.  I found that there were some gaps, so I took them down and did some more planing.  Once I was satisfied with the way they fit together, I took them back down and put some glue on them.

For such a long and thick slab, I needed every pipe clamp that I could get.  In my case I did't have any, but fortunately I knew someone that had plenty.  I ended up using 12.

After 24 hours, I took the clamps off.  My next step was to make to two long edges flat and parallel. I began working one of the edges the same way that I had worked the inside edges that I had glued together.  However, this it wasn't nearly as easy because the top edge was now 12" higher.  When standing on the floor, the top edge of the slab was about even with my neck.  This made it almost impossible to get good downward pressure on the plane.  Then I had the idea to use the leg posts and boards for the stretchers to stand on.  This helped a little, but I was still not at a good angle for planing.  By time I finished the first edge, I was completely exhausted and my muscles were sore for days.  I realize now that I should have built two shorter saw horses before I even started, which would have made all the planing much easier.

Wednesday, January 9, 2013

New Tools

While looking at what it will take to build my new workbench, I realized that I didn't have the tools to do it.  Fortunately, this was right before the Christmas season, so I was able to pick up some of what I need as gifts.  Here is what I picked up this year:

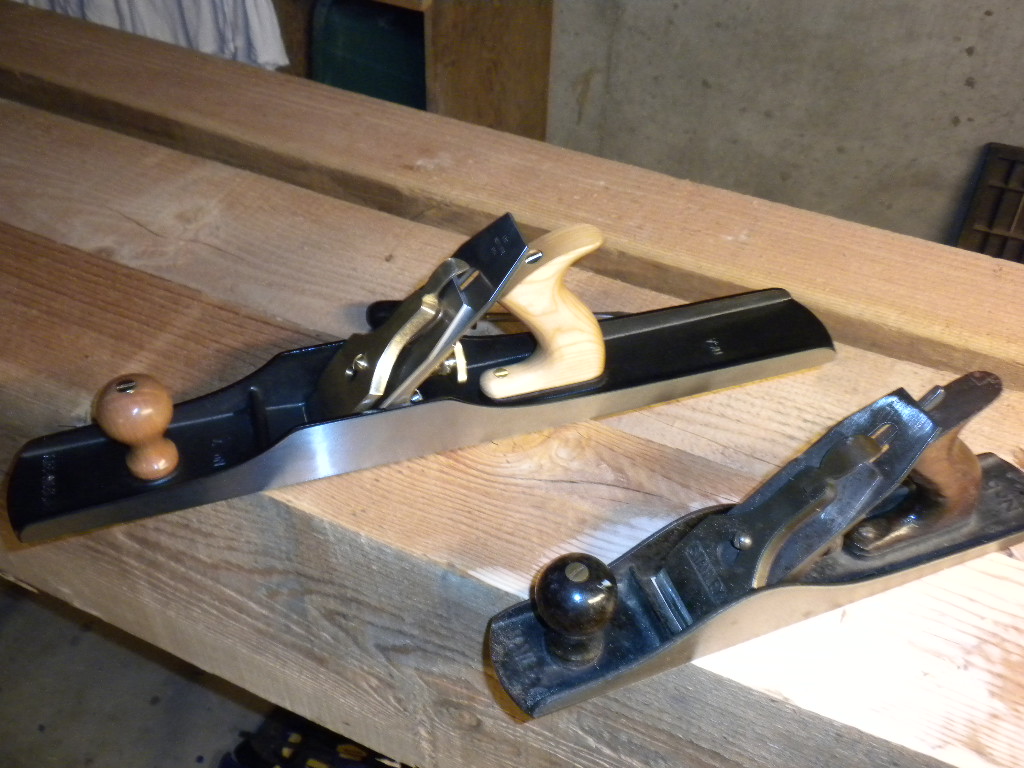
A little before Christmas I set out to buy a Stanley No. 5 plane on ebay and I managed to pick this one up for $31.


It came in pieces, which was fine, because I wanted to tune it up since it was likely made in the 1930's.  First I cleaned the body with mineral spirits and then I flattened the frog on my diamond board.  This will make sure that the blade will sit perfectly flat against it, which keeps it from chattering while in use.


Next, I flattened the blade as much as possible on the diamond board and ground a curved edge on it with my bench grinder.  The reason for the curved edge is because I want to use this plane to quickly remove large amounts of material and the curve will really dig in to the wood.


Here are the tools that I got for Christmas.  On the left is my new pride and joy, a Lie-Nielsen No. 7 jointer, which is 22" long.  This was my present to myself and it has been fun to use.

I also go a wooden mallet, 3/8" Sorbey mortise chisel, honing guide, and precision square from my wife and mother-in-law.


My new Lie-Nielsen No 7 and Stanley No 5 Planes

Thursday, January 3, 2013

Beginnings of a Workbench


As I mentioned in my last post, I've decided that my next project would be to build a workbench, specifically  one that is based on the 18th century design of Andre Ruobo.  The design will be very similar one built by Chris Schwarz in his book The Workbench Design Book.  It will consist of a thick bench top (up to 6 inches) as well as stout legs.  In the book, Schwarz uses two slabs of cherry for the top and glues them together for a 20" wide bench.  This sounded like a good idea, except no way would I be able to find two slabs of hardwood like that.

The only large pieces of lumber that I was able to find was fir timbers, which I sourced from a local lumber yard.  I ordered two eight feet long 6" x 12" timbers for the workbench top and a 12 feet long 6" x 6" timber to be used for the legs. Usually these timbers are supplied green, but I had them kiln dried so that they wouldn't be shrinking after I built the bench and I didn't have six years for them to dry naturally.
One side effect of the kiln drying is that the two large timbers developed some pretty severe checks, as you can see by the picture at the left.  I think they may have been dried too rapidly and I hope that these checks don't cause me problems down the road because they are pretty deep.  If I had to do it over again, I would probably use four 6x6 timbers instead of the two 6x12's.

I hope to post soon about some of the tools that I've acquired recently in order to build this bench.  And hopefully I can put those tools to work soon and start turning these timbers into something useful.

Tuesday, November 27, 2012

In Need of a Bench

It's been at least a month since I finished my first project and I'm starting to get the itch to get back into the workshop.  That said, I'm not real excited about doing a more complex project with my limited supply of tools and using a couple of sawhorses for a workbench.  I think that I could have built that box from my first project in a fraction of the time it took me if I had the proper equipment.  And, I don't mean power tools.  Having a solid workbench with a vise and some specialty planes would have made many of the tasks a lot easier.

I have read several articles about building workbenches, but in all of them the writer used many power tools which I don't have access to to do the work.  So, thinking that building my own bench was beyond my capability, my next thought was to just buy a bench from a woodworking supply outfit.  I started researching to find the best manufactured ones and it turns out that to get a really solid quality bench I could end up spending around $2,000, like the really nice ones that are custom made from Lie-Nielsen Toolworks.

18th-century Ruobo Workbench by Chris Schwarz
I figure that whatever workbench I get now will be the one that I use the rest of my life, so I want to make sure that I will be happy with it.  I checked a few books out from the library to try and get some ideas, one of which was The Workbench Design Book by Christopher Schwarz.  This is an excellent book, which shows construction of nine different bench designs as well as critiques on each.  One design that I found very helpful was called "18th-century Bench by Hand" in which Chris Schwarz builds a Ruobo style workbench using only hand tools.  The Ruobo bench is based on benches from the writings of the 18th-century French cabinet maker and writer AndrĂ© Ruobo.  Chris Schwarz is a huge fan of this design and he is also a huge fan of hand tools, which makes me trust his opinions more than others who use their benches with power tools.  From the article I can see that I am lacking several tools to build a similar bench by hand, which might sound like a problem, but they are basic tools that I will need for any other project.  For instance, I will need a jointer plane to level the workbench surface, but I've been wanting to buy one for awhile anyway.

I think the Ruobo will definitely be the basis of design for my workbench, but I need to figure out what all features and vise designs I want to incorporate.  The Ruobo's hefty design (with a 5" think bench top) will make it ideal to prevent movement from the hand planing I plan to do.  Also, I love the old school look of this design.


Sunday, November 4, 2012

Project #1 - Dove Tails and Assembly

I finally got around to finishing my box a couple months ago, but I'm just now getting a post together.  Unfortunately I didn't take as many pictures as I would have liked to, so I'll just have to trust my memory on what I did.  

My first step after cutting the grooves in the sides was to layout the pins for the for the dovetail joints. A dovetail joint is basically made up of two cuts that fit together, the dovetails and the pins.  I had read somewhere that it's easier to do the pins first so that's what I did.  In the bottom left picture you can see pins that have already been cut.  To layout the pins, I began by using a wheel gauge to mark the board thickness on all of the boards.
This determines the depth that the pins and the dovetails need to be.  I then picked a number of pins that I thought would look good, in this case three in the middle and half a pin on each edge (bottom left picture).  I picked an angel for the pins that I thought would look good and the spaced them out evenly.  Once the pins were laid out, I made all of the cuts with the grain using my dovetail saw (upper left picture) which is designed for cutting with the grain.  I then used a chisel to mark the cross grain cut and slowly chiseled out the waste in between the pins.  I did a couple of boards this way and then I decided to try a method using a fret saw to cut out the waste in between the pins and then clean it up with a chisel (The upper right picture shows me using this method on the tails).  This turned out to be way faster and I'll probably always use the method in the future.  Once all the pins were cut and cleaned up (its very important to make sure all the pins are straight to ensure a good fit with the tails), I lined the board with the pins up with a board that would have the corresponding tails (bottom left picture).  I then traced the pins, which left the outline for the tails on the opposite piece.  It's very important that I had each joint labelled so that I didn't mix up which tail went with which pin, because each joint will be slightly different.  Once marked, I cut out the tails the same way that I had cut out the pins.  I lined up the joints to see how they would fit and then cleaned them up with a chisel until it looked like they would fit.

After all the joints were complete, I cut the bottom panel to size.  I then attempted to test fit the entire box together, but found out that I had to clean up my grooves first.  It turns out that as I was going deeper while cutting the grooves, I did't go straight down and the walls of the grooves were sloped.  Once I straightened the grooves, the bottom panel fit in pretty good.  I assembled the box by positing the bottom panel into the ends of the box first (bottom right picture).  I then hammered the side boards with the tails down onto the end boards with the pins.  My joints turned out to be too tight and I created some splits at the the corners of a couple of the pins.  The good thing is that because the dovetail is such a strong joint, these splits can't be noticed.

I then disassembled the box, clean up the joints a little bit more, brushed a little wood glue on the joints and then hammered it back together.  I clamped it up over night and when the joints were dry this box was solid as a rock.  I see why the dovetail joint has been used on quality furniture for so many years.  Finally, I cleaned up the surfaces with a scraper and the edges with the block plane and sand paper.  I didn't put any kind of finish on it, because I liked the look of the bare wood.  I may still put some sort of oil on it to protect it, but I need to do some research on that first.
I hope to expand my wood shop before my next project, but there are so many things that I want.  There are many tools that would help speed up these projects and allow me to do more things.  I think I really need a heavy duty workbench with a built in vise that won't move while I'm planing.  I also really need a good set of sharpening stones, because having a nice sharp chisel makes a world of difference.  Of course there's a variety of planes that I would like as well.  Choices. Choices.


Friday, March 30, 2012

Project #1 - Cutting Grooves

Ok, so I'm way behind on my posts and on finishing my first project.  For awhile, I was waiting on a new chisel to come in the mail, which I needed cut the grooves in the sides of the box.  Well, it finally came and I got the grooves cut, but then Janel and I decided to start a bathroom remodeling project.  I've spent just about every night for the past three weeks working on the bathroom, so I haven't had time (or energy) to post or finish the box.
I got my new 1/4" chisel in about four weeks ago.  It is from Lie-Nielsen Toolworks and it came well sharpened and ready to go.  I wanted a quality chisel for the groove cutting, because I knew it would be hard work.  The maple I'm using for the box is pretty hard stuff and using anything but an extremely sharp chisel would have just about killed me.


To cut the grooves, I took a marking gauge and made a mark 1/4" above the bottom edge of all four side boards.  I then took the chisel with the bevel side up and cut a thin shaving along the edge of my mark (upper left picture).  I then went back over it repeatedly until the groove began to form.  At that point the chisel was pretty well guided by the groove and I could put more pressure on the cut to speed things up (upper right picture).


Once the grooves were 1/4" deep I came back and squared up the ends (lower left picture).  I ended the grooves 5/16" from the end of the boards so they wouldn't be visible once assembled.


I have also begun to cut the dovetail joints and will hopefully be able to post on that soon.